Setting up DeployHub
Setup DeployHub via Pipeline Automation and the CLI
The fastest way to setup DeployHub is to use the Ortelius Command Line Interface to automate DeployHub via your CI/CD Pipeline.
Automating Your CD Pipeline with DeployHub
In order to continuously gather pipeline intelligence, DeployHub must become part of your pipeline. DeployHub integrates into your CI/CD process using the Ortelius Open-Source Command Line (CLI). The Ortelius CLI gathers supply chain data based on a single pipeline workflow at the build and deploy steps. The build step gathers Swagger, SBOM, Readme, licenses, Git data, Docker image, and other build output. The deploy step records when a release occurs, what was sent and where the objects were sent to.
The Ortelius CLI is maintained by the Ortelius Open Source Community under the governance of the Linux Foundation’s Continuous Delivery Foundation.
For the most up to date information on the Ortelius CLI visit the Ortelius GitHub Repository. You will find a complete list of parameters for collecting Swagger, SBOM and other tool reports and results.
Ortelius CLI Data Gathering using .toml
The Ortelius CLI reads from a .toml file. The .toml file contains non-derived information for each artifact that you create at your build step. In DeployHub, an artifact is referred to as a Component. A Component is a Container, DB Object, or file object (.jar, Lamda Function, Apex file, etc.). The .toml file will provide the ’non-derived’ data for the Component you are tracking in DeployHub, which includes the Component name, owner, Component type, and owner contact details. The Ortelius CLI will read the .toml file from the Git Repository associated to your pipeline. If you are using a Mono Repository for your entire codebase, you will need a separate Component.toml file for each Component managed in sub-directories.
«««< HEAD In a cloud-native microservice architecture, there are many, if not hundreds, of Components. Organizing your Components within DeployHub is done in two ways. They are grouped based on a subject Domain and assigned to a logical Application. Not all Components need to be assigned to an Application, but they should be stored in a subject matter Domain so they can be easily found and reused.
A logical Application is a collection of Components that make up a complete software system consumed by an end user. Applications are composed of shared Components and Application specific Components, and are a logical representation of what Components need to be deployed for the software system to run.
In a cloud-native, microservice architecture there are many, if not hundreds, of Components. Organizing your Components within DeployHub is done in two ways. They are grouped based on a subject Domain and assigned to a logical Application. Not all Components need to be assigned to an Application, but they should be stored in a subject matter Domain so they can be easily found and reused.
A logical Application is a collection of Components that make up a complete software systems consumed by an end user. Applications are composed of shared Components and Application specific Components, and are a logical representation of what Components need to be deployed in order for the software system to run.
73eb5dccd4caeb68eeac87fb6f0134951a0704c8
Note: Once created, your .toml file does not need to be updated unless the non-derived information changes or you want to reorganize to which Applications or Domains the Component has been assigned. For example, a Component has been reassigned to a new owner and new team represented by a Domain or Application.
Variable Resolution
The ${VARIABLE} syntax represents an environment variable or derived variable that will be resolved at execution time. In the below example in Step 2, ${GIT_TAG} is a variable that will be derived by the CLI from git. The derived value will be inserted in to the ${GIT_TAG} variable placeholders.
Derived Variables
| Attribute Name | Environment Variable | Description |
|---|---|---|
| GitBranch | GIT_BRANCH | Name of the Git Branch |
| GitBranchCreateCommit | GIT_BRANCH_CREATE_COMMIT | Commit that the branch was created from |
| GitBranchCreateTimestamp | GIT_BRANCH_CREATE_TIMESTAMP | Timestamp of the commit that the brach was created from |
| GitBranchParent | GIT_BRANCH_PARENT | Parent branch that the active branch was created from |
| GitCommit | GIT_COMMIT or SHORT_SHA | Commit SHA |
| GitCommitAuthors | GIT_COMMIT_AUTHORS | userids that created the commits in the repo |
| GitCommittersCnt | GIT_COMMITTERS_CNT | number of users creating commits in the repo |
| GitCommitTimestamp | GIT_COMMIT_TIMESTAMP | Timestamp of when the commit was created |
| GitContribPercentage | GIT_CONTRIB_PERCENTAGE | GitCommittersCnt / GitTotalCommittersCnt * 100 |
| GitLinesAdded | GIT_LINES_ADDED | Number of lines added since previous Component Version |
| GitLinesDeleted | GIT_LINES_DELETED | Number of lines deleted since previous Component Version |
| GitLinesTotal | GIT_LINES_TOTAL | Total number of changed lines for the commit |
| GitOrg | GIT_ORG | GitHub Organization |
| GitRepo | GIT_REPO | GitHub Repo Name without Org Name |
| GitRepoProject | GIT_REPO_PROJECT | Org/Repo |
| GitSignedOffBy | GIT_SIGNED_OFF_BY | Email in the Signed-off by: commit message |
| GitTag | GIT_TAG | Current tag if active otherwise equal to Git Branch |
| GitUrl | GIT_URL | Full url to the git repo |
| GitVerifyCommit | GIT_VERIFY_COMMIT | Y/N is the commit signed by a verified userid |
Derived Files
The CLI will look for Readme, License, Swagger and OpenAPI files and upload those files to the Component Version.
Readme File Names Scanned for
- README
- README.md
- readme
- readme.md
License File Names Scanned for
- LICENSE
- LICENSE.md
- license
- license.md
Swagger and OpenAPI File Names Scanned for
- swagger.yaml
- swagger.yml
- swagger.json
- openapi.json
- openapi.yaml
- openapi.yml
Perform the following steps to add your Components using the .toml file
Step 1 - Define Your DeployHub Pipeline Variables
The following variables should be set at the beginning of your Pipeline.
| Variable | Value | Description |
|---|---|---|
| DHURL | URL to DeployHub Login | The URL used to access DeployHub. |
| DHUSER | UserID | The ID used to log into DeployHub |
| DHPASS | password | The password used to log into DeployHub. This can encrypted based on the CI/CD solution. |
| DOCKERREPO | Name of your Docker Repository | For Components that are Docker Images. Not needed for non-docker objects. |
| IMAGE_TAG | Tag for the Docker Image if used | For Components that are Docker Images. Not needed for non-docker objects. |
Example
export DHURL=https://deployhub.example.com
export DHUSER=Stella99
export DHPASS=password
export DOCKERREPO=quay.io/DeployHub/hello-world
export IMAGE_TAG=1.0.0
Step 2 - Create your Component.toml file
Cut and paste the following into a component.toml file, update ‘your’ information, and commit/push it to your Git Repository.
# Application Name and Version - not required. If not used the Component will not be associated to an Application
Application = "GLOBAL."your Application Name"
Application_Version = "your Application Version"

# Define Component Name, Variant and Version - required
Name = "GLOBAL.your Component Name"
Variant = "${GIT_BRANCH}"
Version = "vyour Component Version.${BUILD_NUM}-g${SHORT_SHA}"

# Key/Values to associate to the Component Version
[Attributes]
    DockerBuildDate = "${BLDDATE}"
    DockerRepo = "${DOCKERREPO}"
    DockerSha = "${DIGEST}"
    DockerTag = "${IMAGE_TAG}"
    DiscordChannel = "your Discord channel"
    SlackChannel = "your Slack Channel"
    ServiceOwner = "${DHUSER}"
    ServiceOwnerEmail = "your Component Owner Email"
For example:
# Application Name and Version
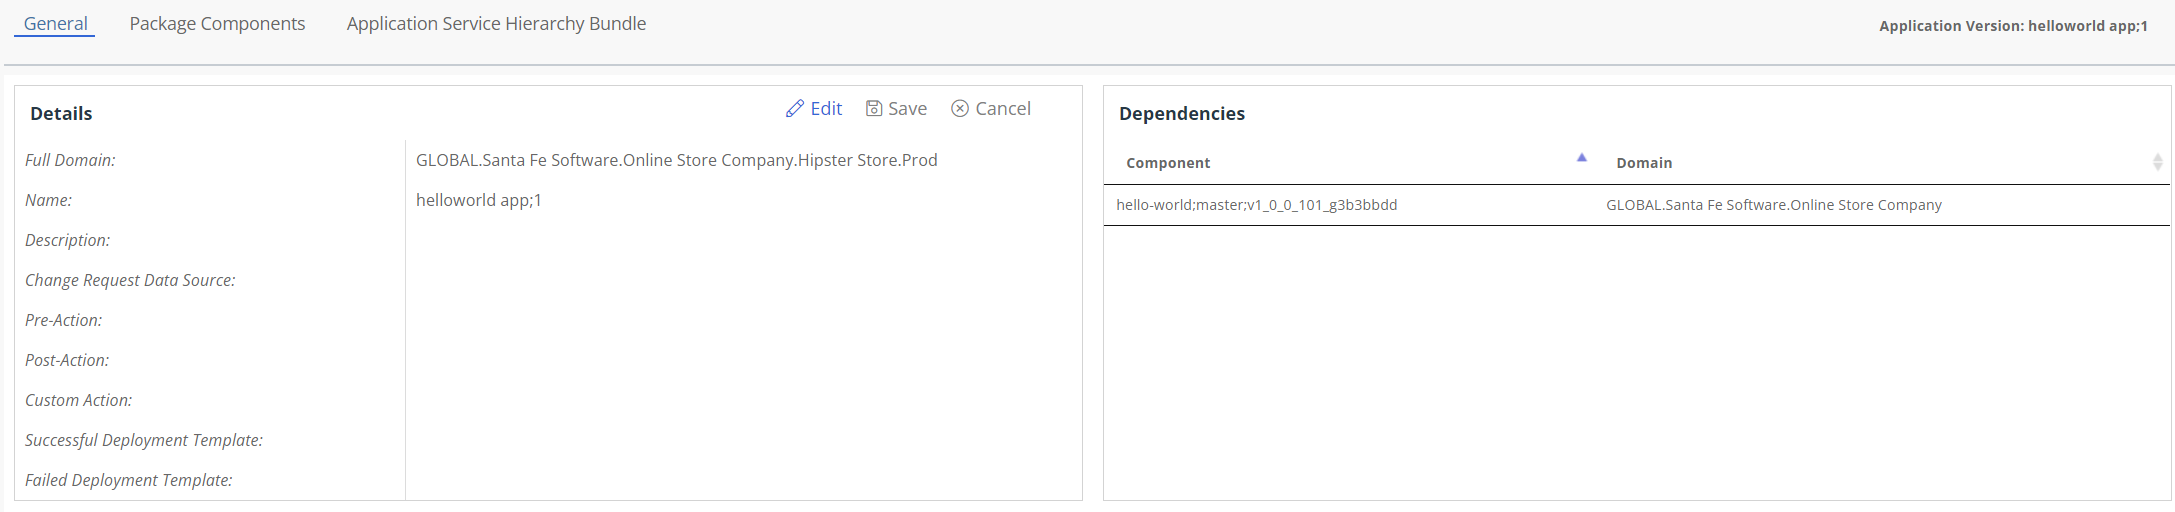
Application = "GLOBAL.Santa Fe Software.Online Store Company.Hipster Store.Prod.helloworld app"
Application_Version = "1"
# Define Component Name, Variant and Version
Name = "GLOBAL.Santa Fe Software.Online Store Company"
Variant = "${GIT_BRANCH}"
Version = "v1.0.0.${BUILD_NUM}-g${SHORT_SHA}"
# Key/Values to associate to the Component Version
[Attributes]
DockerBuildDate = "${BLDDATE}"
DockerRepo = "${DOCKERREPO}"
DockerSha = "${DIGEST}"
DockerTag = "${IMAGE_TAG}"
DiscordChannel = "https://discord.gg/wM4b5yEFzS"
ServiceOwner= "${DHUSER}"
ServiceOwnerEmail = "[email protected]"
Note: For SaaS users, you will have a second high-level qualifier that was created as part of your sign-up. This second high-level qualifier must be used as the start of your Application Name and Component Name. For example: GLOBAL.Santa Fe Software.Online Store.
Step 3 - Add a step in your pipeline to run Syft if you are not generating SBOMS (Optional)
DeployHub can consume any SPDX and CycloneDX formated SBOM. If you are already generating SBOMs, you will pass the name of the SBOM results to DeployHub is step 4 below. If you are not generating SBOMs as part of your pipeline process, you will need to add SBOM generation to collect the lower dependency data. Following is how to add Syft to your workflow to include the collection of SBOM data.
Syft SBOM tool will generate Software Bill of Material Reports for popular coding languages and package managers, including Docker images.
The following code example scans a Docker Image to generate the SBOM. See Syft Options to scan other objects and coding languages.
# install Syft
curl -sSfL https://raw.githubusercontent.com/anchore/syft/main/install.sh | sh -s -- -b $PWD

# create the SBOM
./syft packages $DOCKERREPO:$IMAGE_TAG --scope all-layers -o cyclonedx-json > cyclonedx.json

# display the SBOM
cat cyclonedx.json
Step 4 - Run the Ortelius CLI to add Your Component and Create an Application
Note: To complete the process you will need to install the Ortelius CLI where your CI/CD server is running. Refer to the Ortelius GitHub CLI Documentation for installation instructions.
Execute the following calls to the Ortelius CLI as part of your workflow. It should be called after the build and SBOM generation:
With CycloneDX SBOM
dh updatecomp --rsp component.toml --deppkg "cyclonedx@name of your SBOM file"

Example:
dh updatecomp --rsp component.toml --deppkg "[email protected]"
With SPDX SBOM
dh updatecomp --rsp component.toml --deppkg "spdx@name of your SBOM file. "

Example:
dh updatecomp --rsp component.toml --deppkg "[email protected]"
Without SBOM
dh updatecomp --rsp component.toml
Results using the CLI in your CI/CD pipeline
Application to Component Dependencies
Application Level SBOM and CVE

Note: CVE Results may vary depending on the time of the scan.
Component Ownership

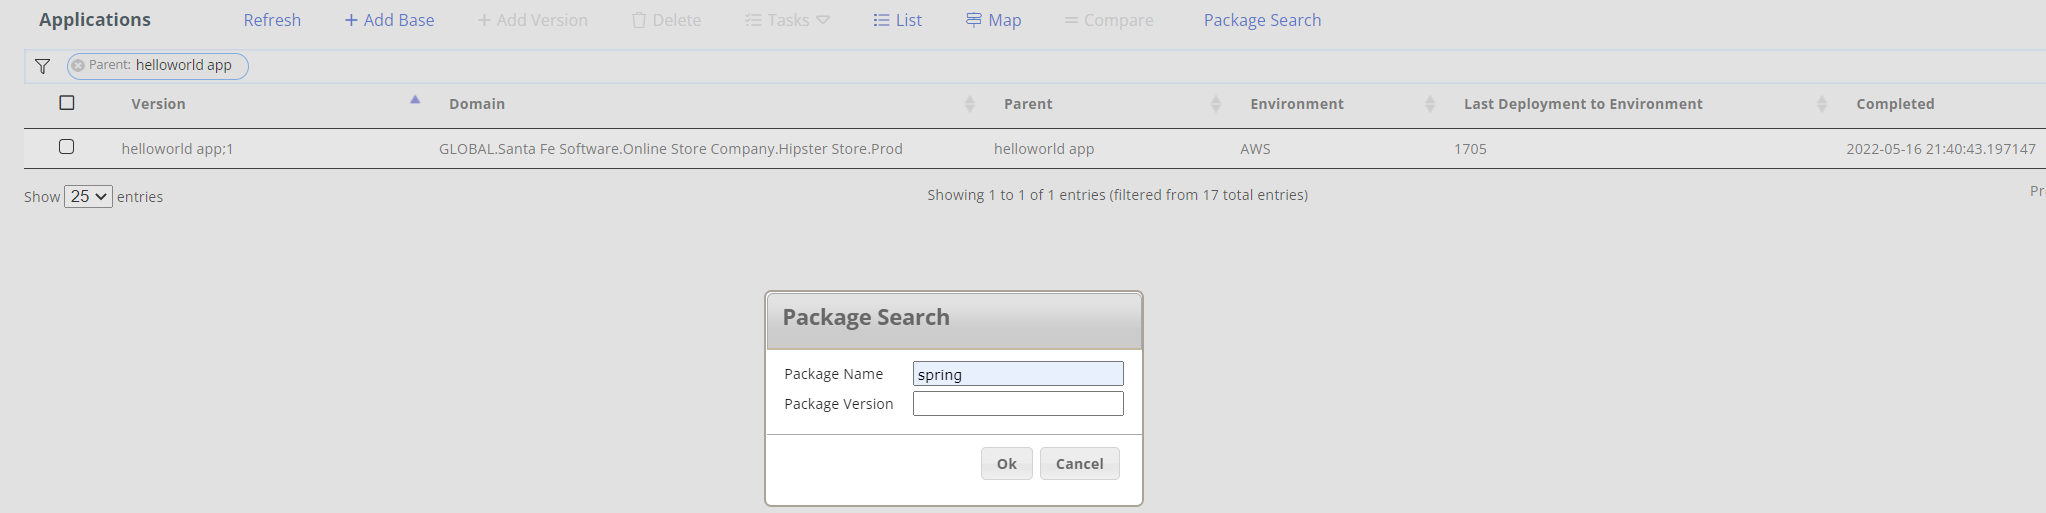
Supply Chain “Package” Search

Set Up DeployHub via the User Interface
| Step | Description |
|---|---|
| Create a Domain | Define your catalog by creating a Domain hierarchy for sharing. For SaaS user, your Company Domain and your Project Domain are automatically created. With an on-premise version, you will see only a Global Domain. You will need to create your Domains to get started. |
| Add your Credentials | Credentials are user name and password pairs needed for accessing external resources like Repositories and Endpoints. It is best to set them up first so they are available when needed. |
| Add your Repositories | Add your Repository before you begin defining your Components as you will need to specify a Repository for your finding your Component. DeployHub needs to know where to pull files and containers. |
| Define your Environment and Endpoints | Next, identify your deployment landscape before you execute a deployment. You will deploy to an Environment which is a collection of Endpoints. |
| Publish your Components | Publish your collection of Components before you create your Application. |
| Package Your Application | Create an Application Base line to track, version and map your Components overtime. |
Once this basic setup is complete, integrate DeployHub into your CI/CD process to automatically track, version and deploy your Application and Components.
If you want to customize how DeployHub manages deployments - you will do this using Actions, Functions & Procedures.
Feedback
Was this page helpful?
Glad to hear it! Please tell us how we can improve.
Sorry to hear that. Please tell us how we can improve.