Reverse Proxy for Deployments
Installing the Reverse Proxy for Managing Deployments using DeployHub Pro
DeployHub Pro includes a deployment engine that can be used to deploy your Applications. Alternatively you can push deployment information via your CI/CD pipeline using the Command Line Interface. You will not need the Reverse Proxy if your are pushing deployment results with the CLI.
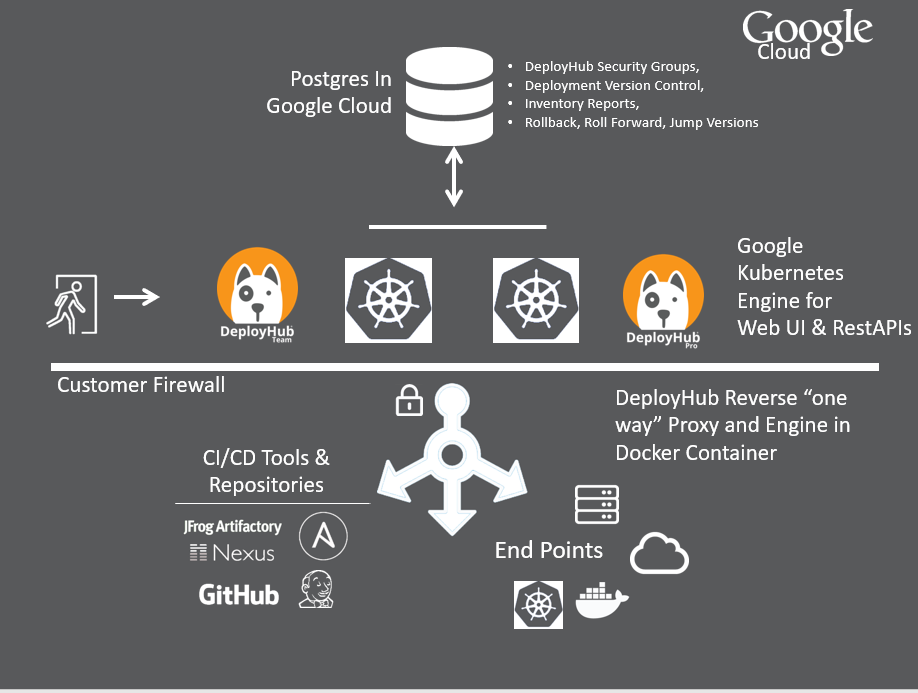
To start using DeployHub Pro to deploy your Applications and Components, you will first need to install a Reverse Proxy inside your firewall. This contacts DeployHub Pro in our SaaS environment to receive deployment requests. The Reverse Proxy is required for deploying into your environment.
A Reverse Proxy queries the DeployHub Pro SaaS every minute to determine if a deployment is needed. For SaaS users, it provides a security layer, preventing you from opening a port to the outside world. It uses standard HTTPS requests to communicate to the DeployHub Pro SaaS on the Google GKE environment. Nothing from the external Google side of the firewall is pushed to the local DeployHub Pro Reverse Proxy.
Once the Reverse Proxy determines that a deployment is needed, it executes the deployment using all files on the inside of the firewall. The one-way communication initiates the deployment but all work is done local to your network. On completion of the deployment, the logs are pushed back up to the DeployHub Pro SaaS for viewing and audit.
Reverse Proxy Installation
The Reverse Proxy runs as docker container. In order to install it, you need to install Docker.
Docker Installation Guides
Test your Docker Install
See the Docker Install Test instructions
Installing Your DeployHub Pro Reverse Proxy Docker Image
The DeployHub Pro Reverse Proxy Docker Image is found on the Redhat Quay Docker Registry. Follow the steps below to install the Reverse Proxy into your Docker installation.
Step 1 - Set your CLIENTID as environment variable
Use your Client ID that you received in your “Welcome” sign up email from DeployHub Pro. It will be a hexadecimal number such as:
Your CLIENTID is 6d961c2d-69a4-4660-8a4a-aaea11276864
Run:
export CLIENTID="Your ID"
For example:
export CLIENTID=6d961c2d-69a4-4660-8a4a-aaea11276864
Step 2 - Pull Reverse Proxy from Redhat Quay Registry
Run:
docker pull quay.io/DeployHub Pro/DeployHub Pro-rproxy:latest
Step 3 - Find your image SHA
Run:
docker images | grep DeployHub Pro-rproxy | grep latest
Find the image SHA from the third column in the output.
quay.io/DeployHub Pro/DeployHub Pro-rproxy v9.0.0 0114088b0b44 6 days ago 3.32GB
The SHA in the above example is 0114088b0b44.
Step 4 - Start the container for Linux and OS/X
Use the image SHA from Step 3 as the last parameter to the docker run.
docker run -d --hostname `hostname` -e CLIENTID=$CLIENTID -v ~/.ssh:/keys:Z 0114088b0b44
Step 5 - Access DeployHub Pro from your browser
DeployHub Pro is accessible through the following url:
https://console.DeployHub Pro.com/dmadminweb/Home
Login using the UserID and Password you used when you Signed-up for DeployHub Pro
Step 6 - Confirm Your Reverse Proxy is Running
In the upper right hand corner you will see a message that should say “2 out of 2 Reverse Proxy Running.” There is a default proxy used to deploy into the DeployHub Pro environment for the Hipster Store Tutorial.
Feedback
Was this page helpful?
Glad to hear it! Please tell us how we can improve.
Sorry to hear that. Please tell us how we can improve.