Building Your Domain Catalog
A Domain Driven Design
A Domain is how DeployHub Pro organizes and shares data across teams. All DeployHub Pro objects are assigned to a Domain.
Domains and a Domain Driven Design
A Domain Driven Design is critical for organizing and sharing Software Bill of Materials and vulnerability insights across Components, Applications and Endpoints. Domains represent “solution” spaces to facilitate reuse across siloed teams.
Domains manage objects making them easy to find and share. Domains can be structured to closely resemble the patterns of your organization. They can represent functional areas such as ‘security services’ or departments, teams, geographical locations and software projects.
Top Down Structure
Everyone has a single high-level “Global” Domain. All other Domains are Subdomains. For SaaS Users, your sign-up form asked you for a “Company” and “Project.” These values are used to create your initial Domains. If you are using a locally installed version (on-prem), your highest level Domain will be “Global” and you will need to create your own lower level Domains.
A Sub-Domain inherits all the access properties from its parent Domain. This inheritance continues down through all Subdomains.
There are four common ways to implement Domains:
| Purpose | Description |
|---|---|
| Site Domain | This is the highest-level and default Domain. For SaaS Users, your Site Domain will be defaulted to the Company name from your registration. You can rename your Site Domain if needed. For an On-Premise installation, your default Site Domain name is ‘Global.’ You can rename your Site Domain if needed. Anything defined to this level can be shared across all lower level Subdomains. For example, Environments defined to the Site Domain are shared by all child Subdomains. |
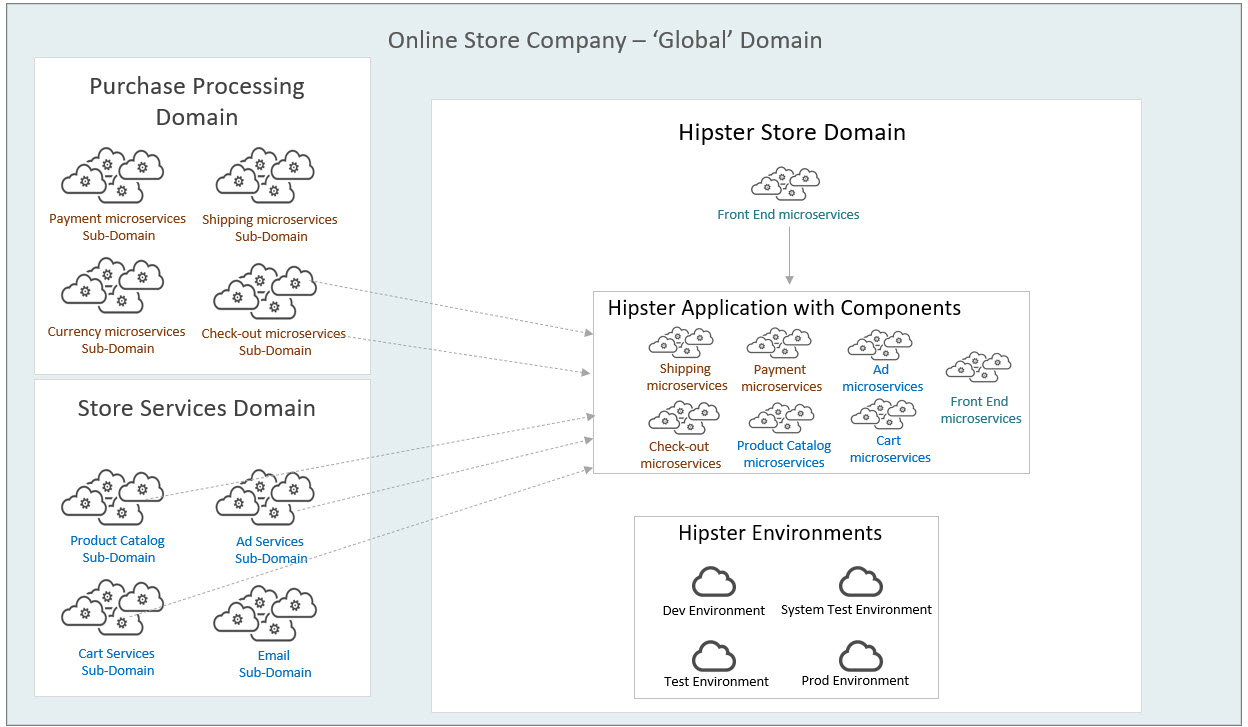
| Catalog Subdomains | These Domains are used to organize all Components. At this level, you create as many Subdomains as needed to represent your Component organization based on the “solution space” they serve. For example, you could design Domains as follows: |
| Division Subdomains | DeployHub Pro Users can take advantage of Division Domains. Larger companies can define a catalog to share Components based on geographical areas, organizational responsibility, or business units. A Division Sub-Domain can have many child Subdomains. For example, a Catalog Sub-Domain for Security and Purchasing Services could be broken down into further Subdomains:
|
| Project Subdomains | Use a Sub-Domain to represent your software Application. |
Below is an example of how the Online Store Company Domains have been defined. For SaaS users, you can review this by inspecting the Online Store Company Domain.
Using the Domain Dashboard
A full view of all Domains is based upon your User privileges. The view is displayed in a list view, starting at the highest level Domain with the ability to drive down into the Subdomains, and Subdomains after that.
When scrolling up or down the Domain hierarchy the detail information is re-displayed according to where you are in the list. Below are the details for a Domain.
Domain Details
| Details | Description |
|---|---|
| Full Domain | The fully qualified Domain Name including any parent Domains. |
| Name | The Name of the Domain. |
| Summary | Domain Description. |
| Owner Type | User or Group. |
| Owner | Name of the Owner. |
| Created | Auto-generated date when it was created. |
| Modified | Auto-generated date when it was modified. |
| Engine | The hostname of the deployment engine. Defaults to “Deployment Engine.” This field can be used to specify another DeployHub Pro Deployment Engine for widely distributed deployments. |
| Subdomains | A list of all Subdomains assigned to this Domain. |
| Tasks | Execution of Deployments used with the internal Deployment Engine |
Deployment Tasks
Task are used for executing deployments, or staging a deployment. Tasks can be assigned to any Domain. However, they are most commonly associated to Project Domains. You can assign a Task at a higher Domain level allowing any child Domains to automatically inherit the Tasks. This inheritance simplifies managing Tasks by making some common to all of your Subdomains. However, this means that a Catalog Domain may include Tasks that it cannot use.
The following Tasks are available as default Tasks, but you can create any type of custom Task. A custom Task will call a Custom Action:
- Deploy Version to Environment
- Manually Trigger Action to be executed
DeployHub Pro Calendars
DeployHub Pro includes a “smart” Calendar. The following Task are used to interact with the DeployHub Pro Smart Calendar for Requesting and Approving deployments.
- Request Calendar Entry for Deployment to an Environment
Adding, Editing and Deleting Tasks
You can add new Tasks from the Domain Dashboard by navigating to the Domain and interacting with the Tasks Section. Select the +Add option from the Tasks Section and a pop-up displays all available Tasks. Selecting a Task will add a new row into the table. Use the Task Detail Section to define the unique details of your new Task. You can update or remove a Task by using the Task Section table. Using the checkbox, select the item and use the the Delete or Edit options.
Once you create a Task, it is recommended that you rename that Task to more closely describe its use depending on the options selected.
Below is a description of all Tasks and their detailed information.
Deploy Version to Environment
Deploys an Application or Release version to an Environment. Select the target Environment via a drop-down list.
| “Deploy” Task Detail Fields | Description |
|---|---|
| Name | The unique name of the Task. |
| Created | Auto-generated date and time when added. |
| Modified | Auto-generated date and time when updated. |
| Pre-Action | Change the default behavior by assigning a custom Action to execute as a Pre-processing step. |
| Post-Action | Change the default behavior by assigning a custom Action to execute as a Post-processing step. |
| Available in Subdomains | If selected, all Subdomains will have access to this Task. |
Manually Trigger Action to be executed
Runs a stand-alone Action. For example, if you need to interrupt a deployment process, this Task allows you to execute the steps manually. The manually triggered Action will be placed in the “To do” list of the User or Group that executed the Deploy Task.
| “Manually Trigger” Task Detail Fields | Description |
|---|---|
| Name | The name of the Task - can be changed to make the Task unique. |
| Created | The auto generated date and time the Task was added. |
| Modified | The auto generated date and time the Task was updated. |
| Pre-Action | You can change the default behavior by assigning a custom Action to execute as a Pre-processing step. |
| Post-Action | You can change the default behavior by assigning a custom Action to execute as a Post-processing step. |
| Action to Run | The Action that will be executed manually. |
| Available in Subdomains | If selected, all Subdomains will have access to this Task. |
| Success Notify Template | The Notify Template that will be emailed on a successful Action. You will need to define the Notify Template from the Advanced Features Menu. See more on Notify Templates. |
| Failure Notify Template | The Notify Template that will be emailed on a failed Action. You will need to define the Notify Template from the Advanced Features Menu. See more on Notify Templates. |
Task Execute Access
Once a Task is defined, it must be granted execute access to a Group before it can be invoked. Select the Task using the check box. Drag the desired Group from the Available Groups column to the Group Access area. Users of the Group can then execute the specified task.
Groups are assigned authority on a Task by Task basis. It is possible for a Domain to have two different Tasks with the same function, one of which allows a particular Group to run the Task, and the other which doesn’t. This allows similar Tasks to be created. They can have different characteristics assigned to them such as Pre-Actions and/or Post-Actions, Notification Templates, etc. Also different User Groups can have the authority to run them.
Additional Task Parameters
Additional parameters can be added to a Task. These additional parameters will set Global Variable at execution time. To add them, select the Task from the Task Section. Use +Add to create a new entry into the Parameters table for the selected task. It will have two columns:
-
Label: This will appear on the Task’s execution window whenever the Task is executed.
-
Variable: An Entry, Password, or Dropdown field appears to the right of the Label whenever a Task is executed, where values can be either entered or selected, depending on the Type.
Use the Save to commit the change to the table. Use Edit to update a Task Parameter, or Delete to remove a Task Parameter.
Access Control
Users within designated Groups can update the Domain in various ways. To add a Group to one of the access lists, drag and drop the Group from the Available Groups list onto the desired access list. All Users who belong to a Group in one of the Access lists will be granted access to the Domain. Access control for Domains include:
| Access | Description |
|---|---|
| View | Allows the Group to see the Domain. |
| Change | Allows the Group to change the Domain’s characteristics i.e. Name, Summary, etc. |
| Read | Allows the Group to see the Domain. |
| Write | Allows the Group to create Subdomains. |
Feedback
Was this page helpful?
Glad to hear it! Please tell us how we can improve.
Sorry to hear that. Please tell us how we can improve.